
Forms & Proctoring for Classroom™ | Quilgo
The ultimate solution for creating and hosting online exams, tests and assessments with Quilgo quizzes.
정보 업데이트:2025년 1월 10일
호환 기기:
리뷰 없음
1만+


개요
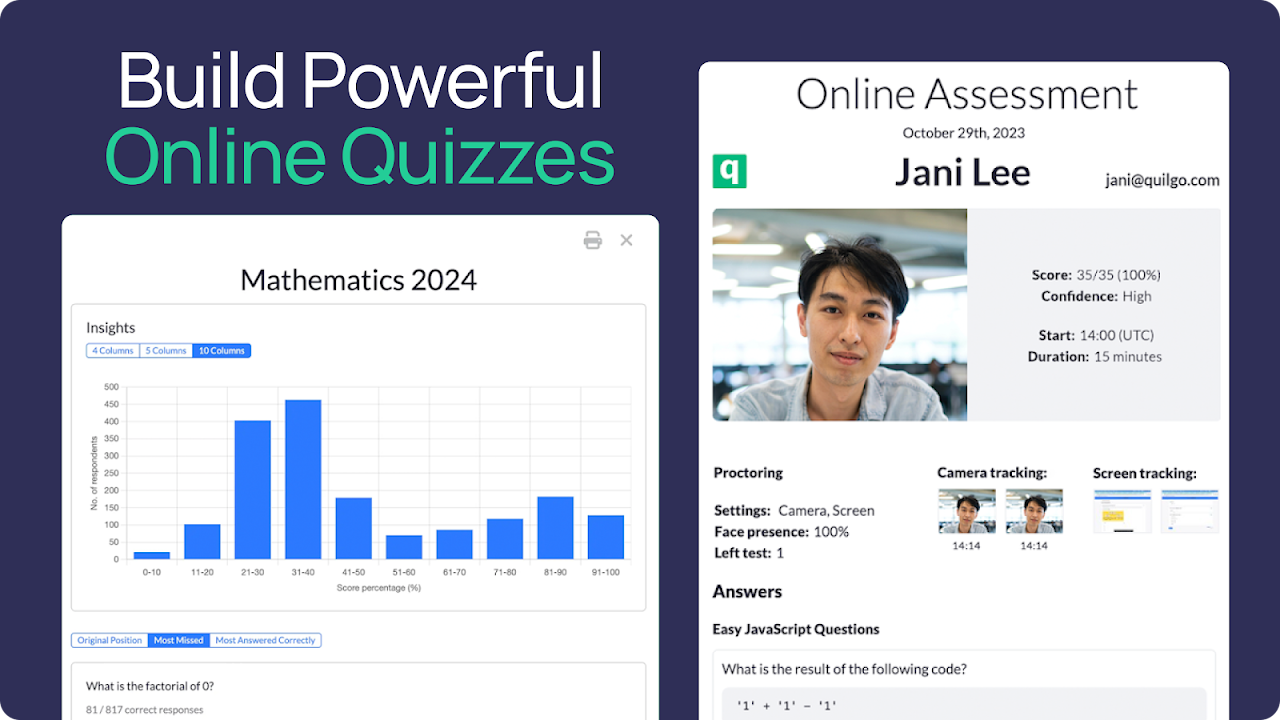
Overview

Quilgo Forms & Proctoring is the ultimate proctoring solution designed specifically for Google Classroom™. Create, host, and automatically secure online exams with ease. Enjoy robust features like customizable quizzes, automated proctoring, and seamless integration to make online testing reliable, scalable, and stress-free.

✨ Key Features

→ Time Management: Set timers, start times, and deadlines for exams.
→ Automated Closing: Auto-close quizzes and auto-submit responses.
→ Media Support: Attach audio and images to questions for richer content.
→ Smart Proctoring: Automated camera and screen tracking with suspicious behavior detection.
→ Advanced Questioning: Use a question bank, randomization, partial scoring, and negative marking.
→ Detailed Reporting: Access reports by student or group, and share quiz results easily.
→ Easy Data Export: Export quiz data in CSV format for further analysis.

⚙️ INSTALL THE ADD-ON

Quilgo installation takes no longer than 2 minutes.

1. Scroll to the top of this page and click "Individual install" to try the plugin yourself or "Admin install" to set up Quilgo for your whole organization.
2. Follow the instructions on the screen. Allow Quilgo to access your classroom and complete the installation.

⚒️ Create Your First Quiz

1. Open Google Classroom™: Create a new class or select an existing one. Add or edit an assignment by clicking the three dots icon and choosing "Edit."
2. Install Quilgo: Under the "Add-ons" section, select "Quilgo Forms & Proctoring" and log in to grant access to your classroom.
3. Build Your Quiz: Click "Create new quiz" and choose "Build a new quiz." Name it (e.g., "Chemistry Exam").
4. Add Questions: Choose a question type (e.g., "Checkboxes"), enter your question and answer options. Mark the correct answers.
5. Set Scoring: Assign a full score (e.g., 10 points) for correct answers, set partial scores (e.g., 3 points), and add negative scores (e.g., -4 points) to discourage guessing.
6. Customize: Organize questions, shuffle or randomize them, and attach descriptions, images, or audio.
7. Save and Close: Click "Save changes" and "Close" to finish.

⏱️ Configure your quiz

1. Close Quiz Builder: After closing the quiz builder, a settings window will open for your exam.
2. Set Start Time: Choose a specific start time or leave it open.
3. Set Duration: Choose the quiz duration (from 1 minute to 24 hours).
4. Set Deadline: Pick a specific deadline or leave it open.
5. Enable Additional Features:
- Enable camera and screen proctoring for cheating prevention.
- Choose whether to allow overtime. If not, the exam will close automatically when time runs out.
- Enable automatic response submission to ensure all answers are submitted on time.
- Decide if the score should be shown after submission.
6. Save Settings: Click "Save settings" to complete.

📎 Attach the Quiz to Your Assignment

1. Click "Attach to Assignment": To attach your quiz to the assignment.
2. Multiple Quizzes: You can create and attach as many quizzes as needed.
3. Note: A quiz can only be attached once, but you can duplicate it and attach copies to other assignments.
4. Return to Assignment: Close the window to go back to your assignment.
5. Send to Students: Send your assignment to students as usual.

📊 View Results & Reports

1. Open Quiz Attachment: Go to your assignment page, click "Edit", then click the quiz title with the Quilgo logo.
2. View Responses: Click "Responses" to see all student submissions. You can also download them in Excel format.
3. Aggregated Report: Click "Report" to view the score distribution and the most missed questions, highlighting any knowledge gaps.
4. Individual Reports: In the assignment view, select any student's submission to view their attempts and scores. Click "Report" to access their submission and proctoring results. You can also save the report as a PDF.

🏷️ Free Trial and Pricing

Get started with Quilgo for free! The first 50 test attempts are on us. After your free trial, choose from our premium plans.

To upgrade, click "Edit" on any assignment, locate the "Add-ons" block, and select "Quilgo Forms & Proctoring". Then, click "Upgrade" in the top-right corner, choose your plan, and follow the prompts to complete your purchase.

For more details, visit: https://quilgo.com/pricing?product=classroom

🛟 Support & Feedback

Have questions or feedback? Reach out to us at hello@quilgo.com.
We’d love to hear from you!
추가정보


검색
검색어 지우기
검색 닫기
Google 앱
기본 메뉴